Bread art involves the creative decoration and shaping of bread to create visually appealing designs. This culinary art form can transform simple dough into stunning pieces that are not only delicious but also serve as beautiful centerpieces for any occasion.
Using various techniques such as scoring, shaping, and adding toppings, bakers can express their creativity while making bread. This guide will cover essential methods and tips for creating impressive bread art.
Understanding Bread Art
Bread art is a unique culinary expression that transforms ordinary dough into stunning visual creations.
With a combination of creativity and technique, bakers can craft loaves that are not only delightful to eat but also serve as captivating centerpieces for gatherings and celebrations.
The process involves various methods, including shaping, scoring, and decorating, allowing for endless possibilities in design.
Techniques for Creating Stunning Designs
To achieve impressive bread art, several techniques can be employed.
Bakers often experiment with braiding, shaping dough into animals or flowers, and incorporating natural dyes derived from vegetables to enhance the visual appeal.
These methods can elevate a simple loaf into a work of art, showcasing the baker’s creativity and skill.
Natural Dyes and Decorative Toppings
Using natural dyes is a fantastic way to add vibrant colors to your bread.
Ingredients like beet juice, spinach puree, and turmeric can be used to create beautiful patterns on the dough.
In addition to color, seeds and grains such as sesame seeds, poppy seeds, and oats can be sprinkled on top, adding texture and flavor to the final product.
Shaping and Scoring Techniques
The shaping of the dough is a critical step in creating visually appealing bread.
Dividing the dough into portions allows for various forms, from traditional loaves to intricate designs.
Scoring the surface with a sharp knife not only enhances the aesthetic but also controls the expansion during baking, adding depth and character to the finished loaf.
Creating a Warm Presentation
Once your bread art is baked to perfection, the presentation plays a vital role in showcasing your creation.
Placing the loaf on a rustic wooden board, accompanied by baking tools, creates an inviting atmosphere that highlights the artistry of the bread.
This setting not only enhances the visual appeal but also invites others to appreciate the effort and creativity involved.
Enjoying Your Bread Art
After allowing the bread to cool, it can be displayed as a centerpiece or served at gatherings.
The combination of intricate designs and vibrant colors is sure to impress guests and spark conversations.
Whether enjoyed fresh or used as a decorative element, bread art is a delightful way to celebrate creativity in baking.
Techniques for Bread Art
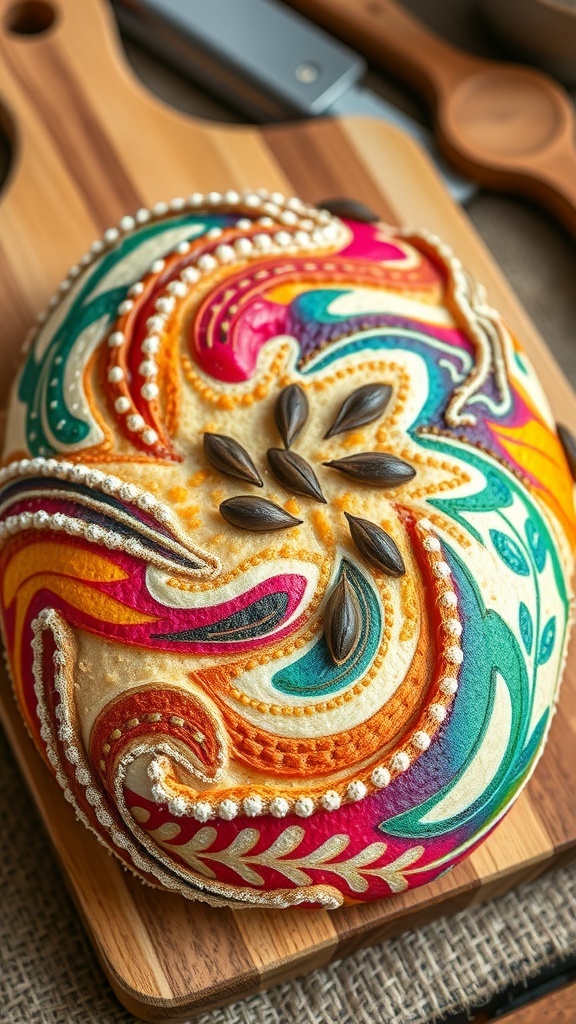
Bread art can include intricate designs, unique shapes, and decorative toppings. Techniques such as braiding, shaping into animals or flowers, and using natural dyes from vegetables can enhance the visual appeal of your bread. With practice, you can create beautiful loaves that are sure to impress.
Ingredients
- Basic bread dough (flour, water, yeast, salt)
- Natural dyes (beet juice, spinach puree, turmeric)
- Seeds and grains for toppings (sesame seeds, poppy seeds, oats)
- Flour for dusting and shaping
Instructions
- Prepare the Dough: Mix the ingredients for the basic bread dough and allow it to rise until doubled in size.
- Shape the Bread: Divide the dough into portions and shape them into desired forms, such as braids, rolls, or decorative shapes.
- Add Color: Use natural dyes to create patterns or colors on the dough. Brush or dip sections of the dough to achieve the desired effect.
- Score the Dough: Use a sharp knife or blade to score the surface of the dough before baking. This allows for controlled expansion and adds texture.
- Bake: Place the shaped dough on a baking sheet and bake according to the recipe instructions until golden brown.
- Cool and Display: Allow the bread to cool before displaying it as a centerpiece or serving it.
Cook and Prep Times
- Prep Time: 2 hours (including rising time)
- Cook Time: 30 minutes
- Total Time: 2 hours 30 minutes
- Servings: 1 loaf
- Calories: 150kcal per slice
- Fat: 1g
- Protein: 4g
- Carbohydrates: 30g
Related
- Creative Yeast Art Techniques
- Strawberry Shortcake Art Ideas and Techniques
- Wacom Intuos Art vs Wacom Intuos Draw
- 5 Easy DIY Christmas Wall Art Ideas to Brighten Your Home