This guide provides a step-by-step process for creating stunning duck-themed acrylic nails. Perfect for nail art enthusiasts, this design combines creativity with technique to achieve a playful and eye-catching look.
Using acrylics allows for durability and a variety of styles, making it an ideal choice for intricate designs like duck nails.
Vibrant Duck-Themed Acrylic Nails
Creating duck-themed acrylic nails is a delightful way to express creativity and showcase a playful design. The vibrant yellow and orange colors combined with detailed duck faces make for an eye-catching look that is sure to turn heads.
The glossy finish of the nails enhances their charm, while the soft pastel background provides a perfect contrast, allowing the duck designs to pop. This combination not only highlights the intricate details but also adds a whimsical touch to your overall nail art.
Essential Tools and Materials
To achieve this stunning duck nail art, gather the necessary tools and materials. An acrylic nail kit is essential, including acrylic powder, liquid monomer, and a brush for application. Nail tips or forms will help shape your design, while a nail file and buffer ensure a smooth surface.
For the vibrant colors, acrylic paint in yellow, orange, and black is required. Nail art brushes and dotting tools will assist in creating detailed designs, and don’t forget nail glue to secure the tips. For those looking to add a little sparkle, consider optional embellishments like rhinestones or glitter.
Preparing Your Nails
Start by preparing your natural nails. Clean and shape them to your desired length, pushing back the cuticles for better adhesion. This step is crucial for ensuring that the acrylic adheres properly and lasts longer.
If you’re using nail tips, apply them with nail glue and trim them to your preferred length. This foundation will provide the perfect canvas for your duck-themed design.
Mixing and Applying Acrylic
Follow the instructions on your acrylic kit to mix the powder and liquid monomer. Using a brush, apply the acrylic mixture to your nails, shaping it as you go. This process requires a steady hand and a bit of practice to achieve the desired shape and thickness.
Once the acrylic is set, you can begin to create the duck design. Use yellow acrylic paint to form the body of the duck, ensuring to cover the entire surface evenly for a vibrant look.
Adding Details and Finishing Touches
After the base color dries, it’s time to add the details. Use orange paint for the beak and black paint for the eyes, bringing your ducks to life with these finishing touches. The key is to take your time and be precise, as these small details make a significant impact on the overall design.
Once the paint is dry, apply a top coat to add shine and durability to your nails. For those who want to elevate their design, consider adding rhinestones or glitter for a touch of glamour.
Final Steps and Care
Allow everything to dry completely before buffing the nails for a smooth finish. This final step ensures that your duck-themed acrylic nails not only look great but feel great too.
With proper care, your vibrant duck nails can last for weeks, making them a fun and playful accessory for any occasion. Enjoy showing off your unique nail art and the creativity that went into making them!
Step-by-Step Duck Acrylic Nail Art
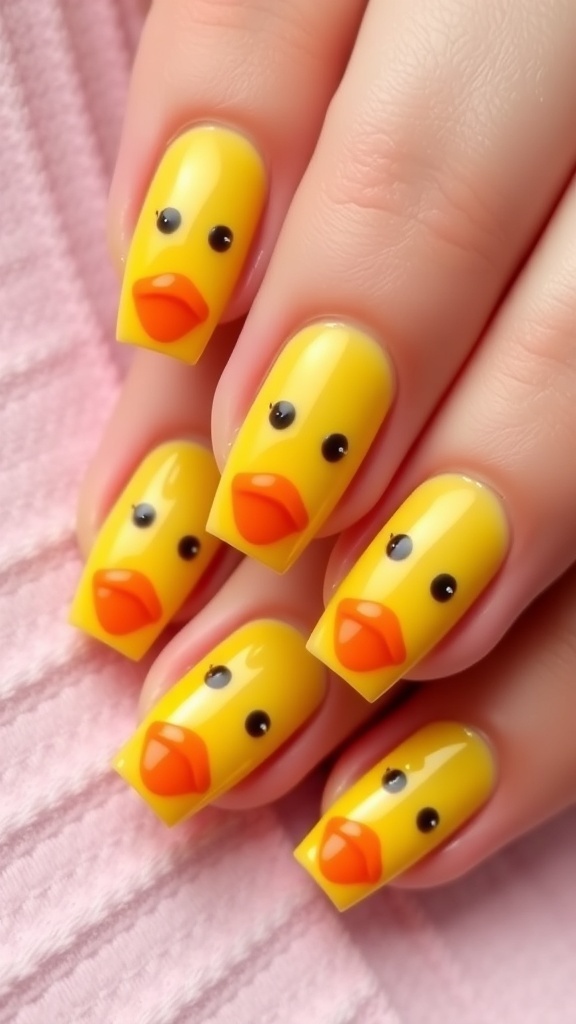
This duck nail art features vibrant colors and detailed designs that mimic the appearance of cute ducks. The process includes preparing your nails, applying acrylics, and adding decorative elements to complete the look.
Ingredients
- Acrylic nail kit (acrylic powder, liquid monomer, and brush)
- Nail tips or forms
- Nail file and buffer
- Base coat and top coat
- Acrylic paint in yellow, orange, and black
- Nail art brushes and dotting tools
- Nail glue
- Optional: rhinestones or glitter for embellishment
Instructions
- Prepare Your Nails: Start by cleaning and shaping your natural nails. Push back cuticles and file the nail surface for better adhesion.
- Apply Nail Tips: If using nail tips, glue them onto your natural nails and trim them to your desired length.
- Mix Acrylic: Follow the instructions on your acrylic kit to mix the powder and liquid monomer. Use a brush to apply the acrylic to your nails, shaping it as you go.
- Create Duck Design: Once the acrylic is set, use yellow acrylic paint to create the body of the duck. Add details like the beak and eyes using orange and black paint.
- Add Finishing Touches: Once the paint is dry, apply a top coat for shine and durability. Optionally, add rhinestones or glitter for extra flair.
- Cure and Finish: Allow everything to dry completely. Buff the nails for a smooth finish and enjoy your new duck-themed acrylic nails.
Cook and Prep Times
- Prep Time: 15 minutes
- Nail Application Time: 1 hour
- Total Time: 1 hour 15 minutes
- Servings: 1 set of nails
- Calories: N/A
Related
- Duck-Themed Nail Art Design
- Pink Duck Nail Art Design
- Creative Duck Nail Art Ideas
- Cute Duck Nail Art Design