Duck nails, also known as ‘flared nails’, were a popular trend in the 1990s characterized by their unique shape resembling a duck’s bill. This nail style is making a comeback, offering a fun and nostalgic way to express personal style.
Creating 90’s duck nails involves specific techniques and colors that reflect the vibrant aesthetics of the decade. This guide will help you achieve the perfect duck nails with step-by-step instructions.
The Comeback of Duck Nails
Duck nails, reminiscent of the 90s, are making a notable return in the world of nail art. Their distinctive flared shape, which mimics a duck’s bill, offers a playful twist to traditional nail designs.
This style is not just about the shape; it’s a canvas for vibrant colors and creative patterns that reflect the exuberance of the decade. Bright hues like neon pink and electric blue, paired with glittery accents, create a striking visual appeal.
Vibrant Color Choices
When it comes to 90’s inspired duck nails, color selection plays a pivotal role. The era was known for its bold and bright palettes, so incorporating neon shades is essential.
Consider using a mix of colors, such as electric blue, hot pink, and even some glittery finishes to elevate the look. These colors not only capture the essence of the 90s but also allow for personal expression through nail art.
Creative Designs and Patterns
Beyond the colors, the designs on duck nails can truly make them stand out. Geometric patterns and playful motifs, like smiley faces, can be incorporated to enhance the fun factor.
Using nail art tools, you can create intricate designs that reflect your personality. The key is to keep it lighthearted and whimsical, embodying the spirit of the 90s.
Step-by-Step Nail Art Process
Creating your own duck nails can be a rewarding experience. Start by prepping your nails; trimming and filing them to achieve the desired tapered shape is crucial.
Once your nails are shaped, apply a base coat to protect them. After that, it’s time to paint! Choose your vibrant colors and apply them in layers, allowing each coat to dry before moving on.
After the base color is set, unleash your creativity with designs. Finish off with a top coat for shine and longevity, and don’t forget to moisturize your cuticles for a polished look.
Setting the Scene
The backdrop for your nail art can enhance the overall aesthetic. A colorful 90’s themed setting, filled with retro patterns and accessories, can provide the perfect atmosphere to showcase your vibrant duck nails.
Consider using props like cassette tapes, bright fabrics, or even vintage toys to create a nostalgic vibe that complements your nail art. This not only highlights your creativity but also immerses you in the playful spirit of the 90s.
Final Touches and Care
After completing your duck nails, taking care of them is essential. Regularly applying cuticle oil will keep your nails healthy and looking their best.
Remember to protect your nail art by avoiding harsh chemicals and using gloves during chores. With proper care, your vibrant duck nails can remain a fun and stylish statement for weeks to come.
Step-by-Step Guide to Duck Nails
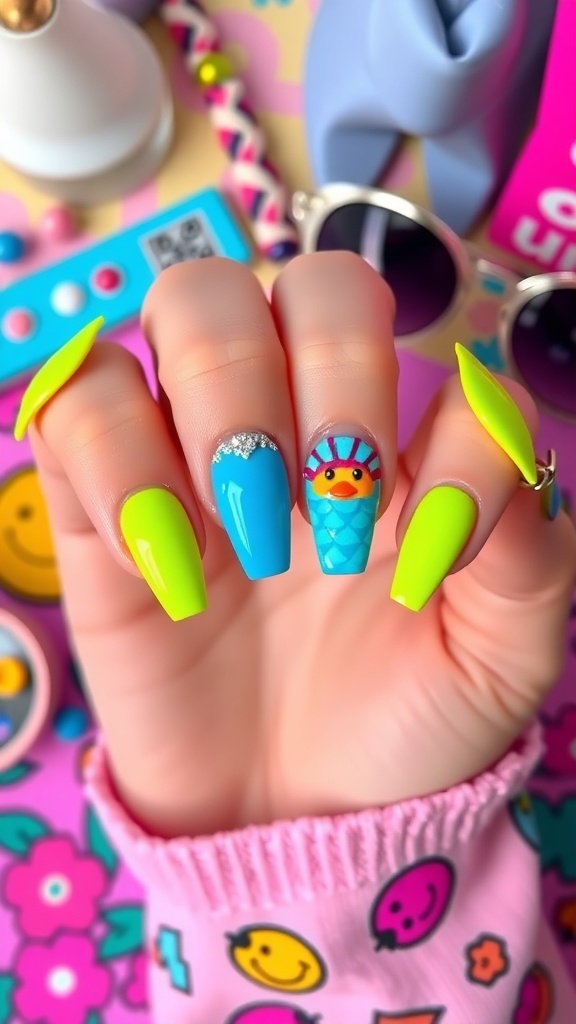
This nail art style features a tapered shape that flares out at the tip, allowing for creative designs and bold colors. The process typically takes about 1-2 hours, depending on the complexity of the design and whether you’re doing it yourself or visiting a salon.
Ingredients
- Nail clippers
- Nail file
- Base coat
- Nail polish (various colors)
- Top coat
- Nail art tools (optional)
- Cuticle oil
Instructions
- Prep Your Nails: Start by trimming and filing your nails to your desired length. Shape them into a tapered point to create the duck nail effect.
- Apply Base Coat: Apply a base coat to protect your natural nails and help the polish adhere better.
- Paint Your Nails: Choose your desired colors and apply nail polish, allowing each coat to dry before applying the next. Use bright and bold colors to capture the 90’s vibe.
- Add Designs: Once the base color is dry, use nail art tools to add designs, patterns, or even glitter for a more playful look.
- Finish with Top Coat: Seal your design with a top coat to add shine and longevity to your nail art.
- Moisturize: Finish by applying cuticle oil to keep your nails and cuticles healthy.
Cook and Prep Times
- Prep Time: 15 minutes
- Nail Art Time: 1 hour
- Total Time: 1 hour 15 minutes
- Servings: 1 set of nails
- Calories: 0 kcal (non-edible)
Related
- Duck-Inspired Zebra Print Nail Art
- 2000s Inspired Duck Nail Art
- Duck-Themed Nail Art Design
- Duck Nail Art with Acrylics