This tutorial will guide you through creating the iconic 90s duck nails using acrylics. Known for their unique shape and vibrant colors, duck nails were a popular trend that made a bold statement.
You’ll learn the necessary steps and techniques to achieve this retro look, perfect for those wanting to embrace a nostalgic style.
Understanding Duck Nails
Duck nails, a trend that emerged in the 90s, are characterized by their distinctive flared shape and bold colors. This unique design offers a playful twist on traditional nail shapes, making them a favorite among those who appreciate retro aesthetics.
The wide base that tapers towards the tip creates a striking silhouette, allowing for creative expression through various colors and embellishments. With the resurgence of 90s fashion, duck nails have made a comeback, appealing to both nostalgic enthusiasts and new fans alike.
Gathering Your Supplies
To achieve the perfect duck nails, it’s essential to have the right tools and materials. An acrylic nail kit is fundamental, as it includes the necessary powder and liquid to sculpt the nails.
You’ll also need nail tips, preferably in a stiletto or almond shape, to create the desired flared effect. Other supplies include a nail file and buffer, base coat, top coat, and vibrant nail polish. For added flair, consider incorporating nail art supplies like glitter and stickers.
Preparation Steps
Before diving into the application process, proper preparation is key. Start by cleaning and filing your natural nails to create a smooth canvas. Pushing back the cuticles and buffing the nail surface will enhance adhesion, ensuring a long-lasting finish.
Choosing the right size nail tips is crucial. Apply them securely with nail glue, making sure they are shaped to your desired length. This foundation sets the stage for the acrylic application.
Sculpting the Acrylic
Mixing the acrylic is the next step. Follow the instructions provided with your acrylic kit to achieve the right consistency. Using a brush, pick up the mixture and apply it to the nail tips, shaping it into the iconic duck nail form.
Focus on creating a wide base that flares out towards the tip. This is where the signature look of duck nails comes to life. Once the acrylic has dried, refine the shape with a nail file, smoothing out any imperfections.
Adding Color and Design
With the nails shaped, it’s time to bring them to life with color. Apply a base coat to protect the acrylic and enhance the adhesion of your chosen nail polish. Vibrant colors are a hallmark of the 90s style, so feel free to experiment with different shades.
For those looking to personalize their nails further, adding nail art designs can elevate the overall look. Glitter and stickers can be used to create a fun and nostalgic vibe, reminiscent of the playful styles of the past.
Finishing Touches
The final step in achieving stunning duck nails is to seal your design with a top coat. This not only adds shine but also provides durability, ensuring your nails look fabulous for longer.
Once everything is dry, admire your work! With the right care, your stylish 90s duck nails will be a standout accessory, perfect for any occasion. Embrace the retro aesthetic and enjoy showcasing your vibrant, flared nails.
Step-by-Step Duck Nails Acrylic Tutorial
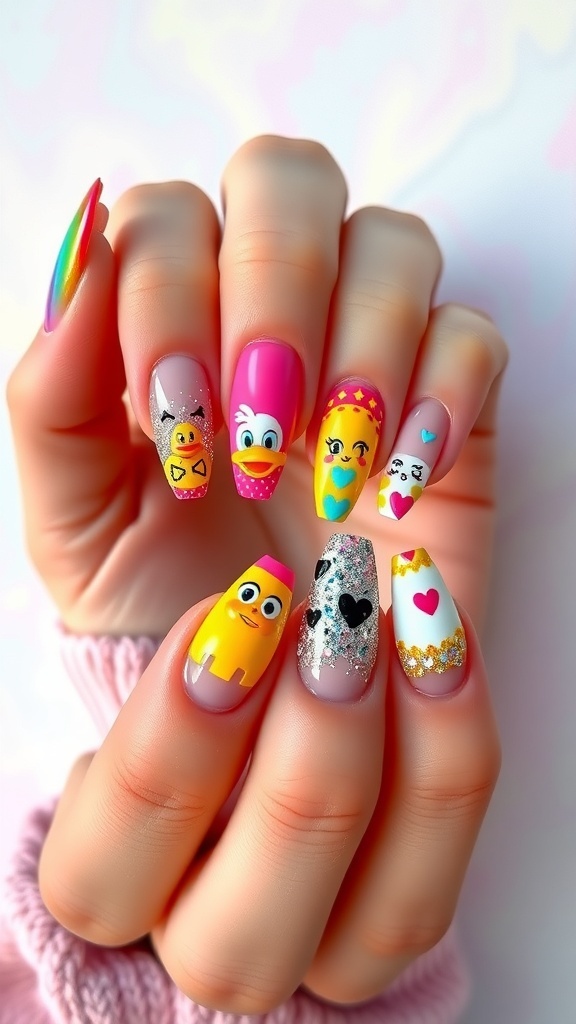
This acrylic nail tutorial focuses on creating duck nails, characterized by their wide, flared shape. The process involves applying a base coat, sculpting the acrylic, and finishing with colorful polish. The entire process typically takes about 2 hours and can be customized with various designs.
Ingredients
- Acrylic nail kit (powder and liquid)
- Nail tips (preferably stiletto or almond shape)
- Nail file and buffer
- Base coat
- Top coat
- Nail polish in vibrant colors (optional)
- Nail art supplies (glitter, stickers, etc. optional)
Instructions
- Prepare Your Nails: Start by cleaning and filing your natural nails. Push back cuticles and buff the nail surface for better adhesion.
- Apply Nail Tips: Choose the right size nail tips and apply them using nail glue. Ensure they are securely attached and shaped to your desired length.
- Mix Acrylic: Follow the instructions on your acrylic kit to mix the powder and liquid. Use a brush to pick up the mixture.
- Sculpt the Acrylic: Apply the acrylic mixture to the nail tips, shaping it into the desired duck nail form. Focus on creating a wide base that flares out towards the tip.
- File and Shape: Once the acrylic has dried, use a nail file to refine the shape and smooth the surface.
- Apply Base Coat: After shaping, apply a base coat to protect the acrylic and enhance polish adhesion.
- Paint with Color: Choose your favorite vibrant nail polish and apply it to each nail. You can also add nail art designs for a personalized touch.
- Finish with Top Coat: Seal your design with a top coat for shine and durability.
Cook and Prep Times
- Prep Time: 20 minutes
- Application Time: 1 hour 30 minutes
- Total Time: 2 hours
- Servings: 1 set of nails
- Calories: N/A
Related
- Duck-Shaped Acrylic Nails Tutorial
- Duck-Inspired French Tip Nails
- 5 Effective Ways to Remove Acrylic Nails at Home
- 5 Gorgeous Acrylic Nail Ideas for Short Nails